来源:https://blog.kuoruan.com/112.html
作者:Index ,百度ID:“度娘程序员”,博主。
生命不息,折腾不止!今天给大家带来的是一款叫做 v2ray 的代理软件。老早就听群友们推荐这款代理软件了,但是由于平时上班,也抽不出时间来看这个软件。趁着中秋放假,稍微试了试,结果确实惊艳到我了!
这是个比较小众的软件,小众但是并不代表它不好用。代理速度,是我们选择一款软件的首要条件,下面是网上一篇帖子:四(三)大开源代理技术测速 仅供参考。而我的实际测试速度也确是如此,而且该软件兼容 Shadowsocks 协议,这意味着,你可以使用 Shadowsocks 客户端来连接它,而不必安装其他的客户端软件,简直是 Shadowsocks 的完美替代品。
服务端安装
官方已经把一键安装脚本写好了,所以安装 v2ray 非常简单:
1
2
3
|
wget https://raw.githubusercontent.com/v2ray/v2ray-core/master/release/install-release.sh
chmod +x install-release.sh
./install-release.sh
|
等待片刻即安装完毕。然后可以启动 v2ray:
1
|
service v2ray start
|
下面可以开始配置了,由于 json 格式不支持注释,下面的所有的注释只做说明使用,请不要将注释添加到你的配置文件中。
使用 v2ray 原版协议
1.服务端配置
然后我们需要修改服务端的配置文件,这是一个 json 文件
1
|
vi /etc/v2ray/config.json
|
文件打开之后你只需要看开头这部分:
1
2
3
4
5
6
7
8
9
10
11
12
13
14
15
16
17
18
19
20
21
|
{
"log" : {
"access": "/var/log/v2ray/access.log", // 访问日志
"error": "/var/log/v2ray/error.log", // 错误日志
"loglevel": "warning" // 日志等级, 警告
},
"inbound": { // 主传入连接
"port": 38154, // 这是服务端的端口, 随机生成
"protocol": "vmess", // 协议
"settings": {
"clients": [
{
"id": "bccc0885-048a-4d5f-ae90-5fa3117fe30d", // 记下这一串 ID, 客户端需要与服务端一致
"level": 1,
"alterId": 64 // 记下, 客户端需要与服务端一致
}
]
}
},
......
}
|
你可以随意修改端口,如果想要修改 ID,可以访问这个网站生成:https://www.uuidgenerator.net/
修改完成之后重新启动 v2ray:
1
|
service v2ray restart
|
2.客户端配置
首先需要下载客户端软件:https://github.com/v2ray/v2ray-core/releases
例如我是 Windows 64位,可以下载 v2ray-windows-64.zip
然后下载客户端启动软件:https://www.v2ray.com/chapter_01/3rd_party.html
Windows 可以下载 v2ray-taskbar:
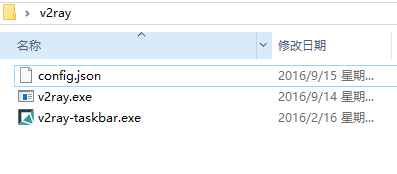
将以上两个压缩文件解压到同一文件夹下:
打开 config.json 开始来配置客户端:
1
2
3
4
5
6
7
8
9
10
11
12
13
14
15
16
17
18
19
20
21
22
23
24
25
26
27
28
29
30
31
32
33
|
{
"log": {
"loglevel": "warning"
},
"inbound": {
"port": 2000, // 本地代理端口
"listen": "127.0.0.1", // 本地IP
"protocol": "socks", // 本地代理协议
"settings": {
"auth": "noauth", // 无认证
"udp": false,
"ip": "127.0.0.1"
}
},
"outbound": {
"protocol": "vmess", // 主传出协议, 和服务端传入协议一致
"settings": {
"vnext": [
{
"address": "10.10.10.10", // 服务端的 IP 地址
"port": 38154, // 服务端的端口
"users": [
{
"id": "bccc0885-048a-4d5f-ae90-5fa3117fe30d", // ID, 与服务端一致
"alterId": 64 // 与服务端一致
}
]
}
]
}
},
......
}
|
默认使用的是 SOCKS 协议,它的说明可以看这里:https://www.v2ray.com/chapter_02/protocols/socks.html
配置完毕之后,双击 v2ray-taskbar.exe 启动,以下为日志:
1
2
3
|
V2Ray v2.0 (One for all) 20160820
An unified platform for anti-censorship.
2016/09/15 22:11:58 [Warning]Point: started on port 2000
|
然后可以配置代理了,比如我在 Chrome 上配置 SwitchyOmega:
需要自动切换的请自行配置。然后将代理切换至 v2ray,尝试访问,配置完毕!
使用 Shadowsocks 协议
v2ray 兼容 Shadowsocks 协议,配置好之后相当于你多了一个 Shadowsocks 服务端。
1.服务端配置
依旧打开配置文件:
1
|
vi /etc/v2ray/config.json
|
文件的默认协议部分可以保留,然后在 inbound 后面加入扩展配置( 注意: 请自行删除注释说明 ):
1
2
3
4
5
6
7
8
9
10
11
12
13
14
15
16
17
18
19
20
21
22
23
24
25
26
27
28
29
30
31
32
33
34
35
36
37
38
39
40
41
42
43
44
45
46
47
|
{
"log" : {
"access": "/var/log/v2ray/access.log",
"error": "/var/log/v2ray/error.log",
"loglevel": "warning"
},
"inbound": {
"port": 38154,
"protocol": "vmess",
"settings": {
"clients": [
{
"id": "bccc0885-048a-4d5f-ae90-5fa3117fe30d",
"level": 1,
"alterId": 64
}
]
}
},
// 以下为添加的内容
"inboundDetour": [ // 扩展的传入连接
{
"protocol": "shadowsocks", // 开启 Shadowsocks 协议
"port": 30001, // 监听 30001 端口
"settings": {
"method": "aes-256-cfb", // 加密方式,支持 aes-256-cfb, aes-128-cfb, chacha20, chacha20-ietf
"password": "v2ray", // 密码,必须和客户端相同
"udp": false // 是否开启 UDP 转发
}
},
{
"protocol": "shadowsocks", // 开启 Shadowsocks 协议
"port": 30002, // 监听 30002 端口,由于 Shadowsocks 的限制,多用户的时候只能开多个端口
"settings": { // 配置和上述类似
"method": "aes-256-cfb",
"password": "v2ray-2",
"udp": false
}
}
],
// 以上为添加的内容
"outbound": {
"protocol": "freedom",
"settings": {}
},
......
}
|
在配置文件中,我开了两个兼容 Shadowsocks 的端口,分别是 30001 和 30002。其他说明可以看这个页面:
重启 v2ray 服务端:
1
|
service v2ray restart
|
2.客户端配置
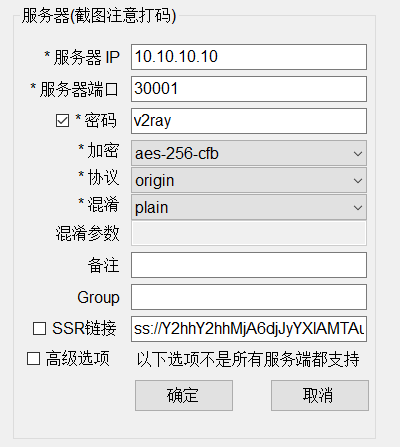
客户端直接使用 Shadowsocks 或者 ShadowsocksR 的客户端。
所有配置完毕,将 Shadowsocks 代理切换到该服务器上,测试。


没有评论:
发表评论